DS18B20 Temperature Sensor
The DS18B20 is a digital temperature sensor from Maxim Integrated that communicates over the 1-Wire protocol. It offers +/-0.5C accuracy, a wide temperature range, and the unique ability to operate multiple sensors on a single data pin — each sensor has a unique 64-bit ROM address for identification on the bus.
For this interfacing you need the following components:
- Arduino board (Uno, Nano, Mega, etc.)
- DS18B20 temperature sensor (TO-92 package or waterproof probe)
- 4.7k ohm resistor (1-Wire pull-up)
- Breadboard and jumper wires
- USB cable to connect Arduino to your computer

Schematic
Connect the DS18B20 to the Arduino as follows:
DS18B20 (TO-92) Arduino
-------------- -------
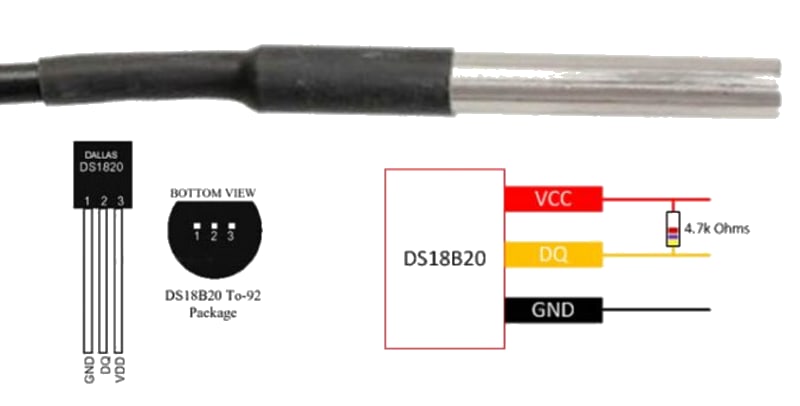
VCC (pin 1 - left) 5V
DATA (pin 2 - center) Digital Pin 2
GND (pin 3 - right) GND
A 4.7k ohm pull-up resistor must be connected between the DATA pin and VCC (5V). For the waterproof probe version (red, yellow, black wires), red = VCC, yellow = DATA, black = GND.
Pin Map
TO-92 Package (flat face toward you, pins down)
| Pin | Name | Connection |
|---|---|---|
| 1 (left) | VCC | 5V (or 3.3V) |
| 2 (center) | DATA | Any digital pin (pin 2 used) |
| 3 (right) | GND | Ground |
Waterproof Probe
| Wire | Connection |
|---|---|
| Red | 5V |
| Yellow | Digital pin 2 (with 4.7k ohm to VCC) |
| Black | GND |
Install necessary Library
Install the following libraries via the Library Manager (Tools > Manage Libraries):
- OneWire by Jim Studt (or Paul Stoffregen)
- DallasTemperature by Miles Burton
Alternatively, using arduino-cli:
arduino-cli lib install "OneWire"
arduino-cli lib install "DallasTemperature"
Code with complete explanation
This sketch reads temperature from a single DS18B20 sensor and prints the values to the Serial Monitor. It also demonstrates how to request temperatures from multiple sensors on the same bus.
#include <OneWire.h>
#include <DallasTemperature.h>

#define ONE_WIRE_BUS 2

OneWire oneWire(ONE_WIRE_BUS);
DallasTemperature sensors(&oneWire);

void setup()
{
  Serial.begin(9600);
  Serial.println("DS18B20 Temperature Sensor Test");

  sensors.begin();

  int deviceCount = sensors.getDeviceCount();
  Serial.print("Found ");
  Serial.print(deviceCount);
  Serial.println(" DS18B20 sensor(s)");
}

void loop()
{
  sensors.requestTemperatures();

  float tempC = sensors.getTempCByIndex(0);

  if (tempC == DEVICE_DISCONNECTED_C)
  {
    Serial.println("Error: Could not read temperature data");
  }
  else
  {
    float tempF = sensors.getTempFByIndex(0);

    Serial.print("Temperature: ");
    Serial.print(tempC);
    Serial.print(" C  ");
    Serial.print(tempF);
    Serial.println(" F");
  }

  delay(1000);
}
Code breakdown
#include <OneWire.h>— provides the low-level 1-Wire protocol communication.#include <DallasTemperature.h>— provides the high-level API for DS18B20 sensors.OneWire oneWire(ONE_WIRE_BUS)— creates a OneWire instance on the specified pin.DallasTemperature sensors(&oneWire)— creates a DallasTemperature instance attached to the OneWire bus.sensors.begin()— initializes the library and discovers sensors on the bus.sensors.getDeviceCount()— returns the number of DS18B20 devices detected on the bus.sensors.requestTemperatures()— sends a conversion command to all sensors. This takes up to 750 ms at 12-bit resolution.sensors.getTempCByIndex(0)— returns the temperature in Celsius for the sensor at the given index (0-based, in discovery order).DEVICE_DISCONNECTED_C— constant (-127C) returned when the sensor is not responding.
Reading multiple sensors
To read from multiple DS18B20 sensors on the same bus, iterate by index:
for (int i = 0; i < sensors.getDeviceCount(); i++)
{
  float temp = sensors.getTempCByIndex(i);
  Serial.print("Sensor ");
  Serial.print(i);
  Serial.print(": ");
  Serial.println(temp);
}
Addressing a specific sensor by ROM address
For permanent installations where sensor order may change, address sensors by their unique 64-bit address:
DeviceAddress sensorAddr;

sensors.getAddress(sensorAddr, 0);
sensors.setResolution(sensorAddr, 12);

sensors.requestTemperatures();
float temp = sensors.getTempC(sensorAddr);
Steps to perform this interfacing
- Connect the DS18B20 to the Arduino with a 4.7k ohm pull-up resistor on the data line.
- Install the OneWire and DallasTemperature libraries via the Library Manager.
- Copy the code into the Arduino IDE.
- Select the correct board and port (
Tools > BoardandTools > Port). - Upload the sketch to the Arduino.
- Open the Serial Monitor (
Tools > Serial Monitor, set baud rate to 9600). - Observe temperature readings printed every second.
- (Optional) Connect additional DS18B20 sensors in parallel on the same data pin — they will be enumerated automatically.
Caution
- A 4.7k ohm pull-up resistor on the data line is required for 1-Wire communication to function. Without it, the sensor will not respond.
- Long cable runs (over 10 m / 30 ft) may require a lower pull-up resistor value (2.2k ohm - 4.7k ohm) and a 100 nF bypass capacitor at the sensor end.
- The conversion time depends on resolution: 9-bit = 94 ms, 10-bit = 188 ms, 11-bit = 375 ms, 12-bit = 750 ms. Allow sufficient time between
requestTemperatures()and reading the value. - When using parasitic power mode (GND and DATA only, no VCC), the data pin cannot drive the sensor during conversion. This mode is not recommended unless you fully understand the 1-Wire parasitic power constraints.
- The DS18B20 is not waterproof on its own. Use the stainless-steel probe version for outdoor, aquariums, or liquid temperature monitoring.
- Avoid bending the TO-92 package leads repeatedly — they can break off at the package body.