DHT11/DHT22 Temperature and Humidity Sensor
The DHT11 and DHT22 are low-cost digital temperature and humidity sensors widely used in Arduino projects. They use a single-wire protocol to communicate data to the microcontroller, making them easy to interface with minimal wiring.
DHT11 vs DHT22
| Parameter | DHT11 | DHT22 (AM2302) |
|---|---|---|
| Humidity Range | 20–80% RH | 0–100% RH |
| Humidity Accuracy | ±5% RH | ±2% RH |
| Temperature Range | 0–50°C | -40–80°C |
| Temperature Accuracy | ±2°C | ±0.5°C |
| Resolution | 8-bit | 16-bit |
| Sampling Rate | 1 Hz (once per second) | 0.5 Hz (once per 2 seconds) |
| Supply Voltage | 3–5.5V | 3–5.5V |
| Interface | Single-wire (bi-directional) | Single-wire (bi-directional) |
| Cost | Very Low | Low |
The DHT22 is more accurate, has a wider range, and is preferred for weather-station-grade projects. The DHT11 is adequate for basic environmental monitoring and learning projects.
For this interfacing you need the following components:
- Arduino board (Uno, Nano, Mega, etc.)
- DHT11 or DHT22 sensor module (or bare sensor)
- 10kΩ resistor (not needed if using a module with a built-in pull-up)
- Breadboard and jumper wires
- USB cable to connect Arduino to your computer
Schematic
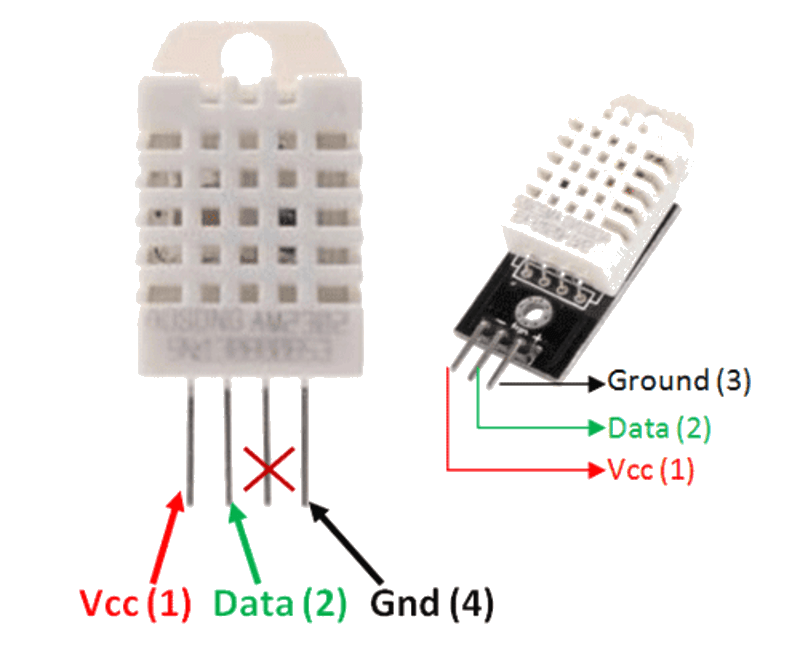
Connect the DHT sensor to the Arduino as follows:
DHT Sensor          Arduino
---------           -------
VCC (pin 1)   -->   5V
DATA (pin 2)  -->   Digital Pin 2
NC (pin 3)    -->   Not Connected
GND (pin 4)   -->   GND
A 10kΩ pull-up resistor must be connected between the DATA pin and VCC (5V). If you are using a DHT sensor module (breakout board), the pull-up resistor is usually already included.
Pin Map
| DHT Pin | Name | Connection |
|---|---|---|
| 1 | VCC | 5V (or 3.3V depending on module) |
| 2 | DATA | Any digital pin (pin 2 used in this example) |
| 3 | NC | Not connected |
| 4 | GND | Ground |
When viewing the flat face of the sensor with pins facing you, pin 1 is the leftmost pin.
Install necessary Library
Install the DHT sensor library by Adafruit. Open the Arduino IDE Library Manager (Tools > Manage Libraries) and install:
- DHT sensor library by Adafruit (version 1.4.4 or later)
- Adafruit Unified Sensor Library by Adafruit (required dependency)
Alternatively, install using the command line (if using arduino-cli):
arduino-cli lib install "DHT sensor library"
arduino-cli lib install "Adafruit Unified Sensor"
Code with complete explanation
This sketch reads temperature (in Celsius and Fahrenheit) and humidity from the DHT sensor and prints the values to the Serial Monitor.
#include <DHT.h>
#include <DHT_U.h>

#define DHT_PIN 2      // Digital pin connected to DHT data
#define DHT_TYPE DHT11 // Change to DHT22 if using DHT22 sensor

DHT dht(DHT_PIN, DHT_TYPE);

void setup()
{
  Serial.begin(9600);
  Serial.println("DHT Sensor Test");

  dht.begin();
}

void loop()
{
  // Wait at least 2 seconds between readings (DHT22 max rate)
  delay(2000);

  float humidity    = dht.readHumidity();
  float temperature = dht.readTemperature();       // Celsius
  float fahrenheit  = dht.readTemperature(true);   // Fahrenheit

  // Check if any reads failed and exit early
  if (isnan(humidity) || isnan(temperature) || isnan(fahrenheit))
  {
    Serial.println("Failed to read from DHT sensor!");
    return;
  }

  // Compute heat index (apparent temperature)
  float heatIndexF = dht.computeHeatIndex(fahrenheit, humidity);
  float heatIndexC = dht.computeHeatIndex(temperature, humidity, false);

  Serial.print("Humidity: ");
  Serial.print(humidity);
  Serial.print("%  Temperature: ");
  Serial.print(temperature);
  Serial.print("°C ");
  Serial.print(fahrenheit);
  Serial.print("°F  Heat Index: ");
  Serial.print(heatIndexC);
  Serial.print("°C ");
  Serial.print(heatIndexF);
  Serial.println("°F");
}
Code breakdown
#include <DHT.h>— includes the DHT sensor library.#define DHT_PIN 2— assigns Arduino digital pin 2 for the sensor data line.#define DHT_TYPE DHT11— set toDHT11orDHT22depending on your sensor.DHT dht(DHT_PIN, DHT_TYPE)— creates a DHT object configured for your pin and sensor type.dht.begin()— initializes the sensor insetup().dht.readHumidity()— returns relative humidity as a float (percentage).dht.readTemperature()— returns temperature in Celsius. Passtrueto get Fahrenheit.dht.computeHeatIndex()— calculates the heat index (apparent temperature) using both temperature and humidity.isnan()— checks if the reading failed (returnsNaNon error).
Steps to perform this interfacing
- Connect the DHT sensor to the Arduino as shown in the schematic above.
- Install the required libraries via the Library Manager.
- Copy the code into the Arduino IDE.
- Change
DHT_TYPEtoDHT11orDHT22matching your sensor. - Select the correct board and port (
Tools > BoardandTools > Port). - Upload the sketch to the Arduino.
- Open the Serial Monitor (
Tools > Serial Monitor, set baud rate to 9600). - Observe temperature, humidity, and heat index readings printed every 2 seconds.
Caution
- The DHT sensor has a limited sampling rate. DHT11 should be read at most once per second; DHT22 at most once every 2 seconds. Reading faster than the rated rate will return stale or corrupted data.
- If using the bare sensor (not a module), a 4.7kΩ–10kΩ pull-up resistor on the DATA line is mandatory for proper communication.
- Keep the sensor away from direct sunlight, heat sources, and moisture condensation for accurate readings.
- Long wires (over 20 cm) between the sensor and Arduino may cause communication errors. Use shielded cable if extension is necessary.
- The DHT11 has a limited temperature range (0–50°C) and will return incorrect readings outside this range.